
To stay in touch with users or perform some of the essential components of a website, such as the registration section or password recovery for users, sending and receiving emails is vital. This article provides a brief explanation of sending emails in the Django framework.
The Django framework has almost complete support for sending emails and does not require additional modules or extra work. The only requirement is an SMTP server along with its settings to send the desired email from the source address to the destination address. First of all, let’s briefly see what SMTP is and what it is used for.
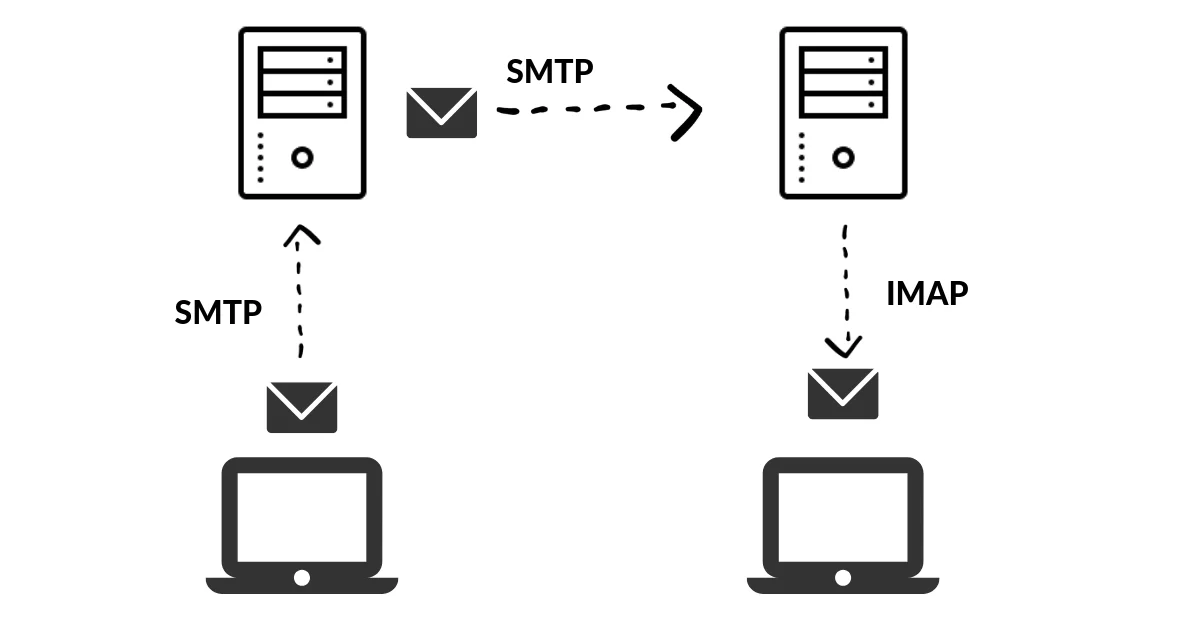
SMTP is actually a protocol that email service providers use to deliver user’s outgoing emails to the destination email address, and a server that uses this protocol is called an SMTP Server.
Famous email services in the world like Yahoo and Gmail each have their own SMTP servers, which are accessible with addresses and specifications like the image below:
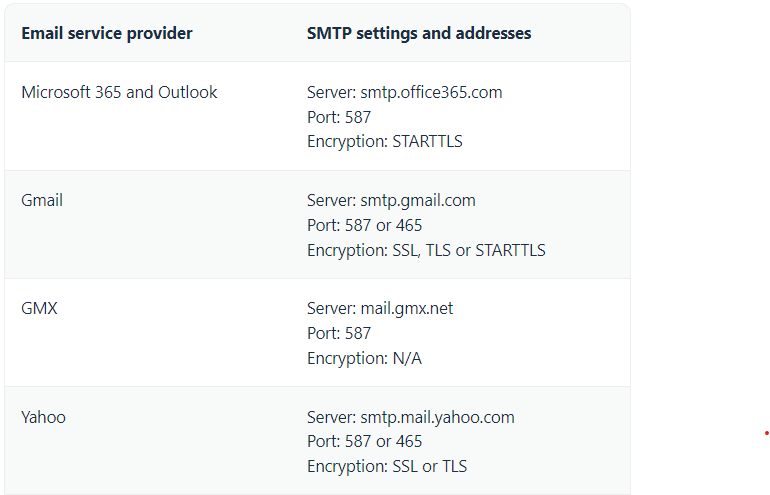
Using the SMTP server of each of these services also requires having a user account along with a username and password, and using them along with the server address and port, we can send emails from the client program.
In the development stage, instead of using real SMTP servers, local instances of them can be used. One of these packages for Python is smtp4dev.
More about SMTP
After setting up the SMTP server, it’s time for Django settings, which I’ll explain step by step for sending a simple email.
1- Django setting file
After selecting the SMTP server and obtaining its connection information, such as address, port, etc., these details must be entered into the Django settings file so that Django can use them to connect to the email server. An example of these settings can be seen in the following code:
EMAIL_BACKEND = 'django.core.mail.backends.smtp.EmailBackend'
EMAIL_HOST = 'localhost'
EMAIL_HOST_USER = ''
EMAIL_HOST_PASSWORD = ''
EMAIL_PORT = 2525
2- Django Url
To send an email, an endpoint is needed to perform the email sending operation upon accessing it, which should be implemented in the URL file:
################# Libs #################
from django.urls import path,include
from . import views
from rest_framework.routers import SimpleRouter,DefaultRouter
#######################################

router = DefaultRouter()
router.register('generalinfo',views.GeneralinfoView)

urlpatterns = [
    path('',include(router.urls)),
    path('send_email/', views.SendEmail)
]
3- Django View
After creating the endpoint to handle requests, it’s time to define the view, which is the main part of sending an email and where the email body and structure should be defined.
Calling the email module in Django:
from django.core.mail import mail_admins, send_mail, BadHeaderError, EmailMessageDefining the view:
def SendEmail(request):
        try:
                message = EmailMessage('test subject', 'new message',
                           'info@cpm.com', ['kasra@gmail.com'])
                message.attach_file('core/static/images/test.jpg')
                message.attach
                message.send()
                # send_mail('test subject', 'new message',
                #            'info@cpm.com', ['kasra@gmail.com'])
        except BadHeaderError:
                pass

        return HttpResponse('email has been sent !')
The most comprehensive method for creating the email body is using the EmailMessage component, which provides complete features, including the ability to add a file to the email and use email templates. In the example email above, a file is added to the main text.
Final Note:
In this article, I tried to give a brief explanation of how email sending works in Django and the steps involved in sending a simple email.
However, receiving emails is a separate section with its own protocol and other settings, which will be covered in future topics.
Thank you for reading this far, and I hope this article has been helpful.


Leave a Reply